facebooktwitterpinterestrss feedemail
Showing posts with label Scrapbook. Show all posts

Tuesday, November 22, 2011

December Daily (2011)


This will be my first year making a December Daily album!
I am so excited to see how the final product turns out at the end of the month.  


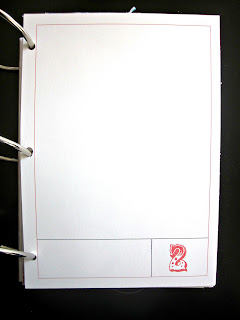
The album is ready to go filled with pretty reds and aquas.  
I made my album a 8.5 x 6 album.  


I liked Ali Edward's page structure for documenting each day, but wanted to make my own.
Using Microsoft Word I made the boxes and borders.  
I hand stamped the numbers in the corners.


 This project allows you to use left over embellishments and pieces you already have in your stash.  


I have a small basket full of embellishments in reds and aquas that I'll add to the pages as I fill them in with our stories and pictures. 


An album documenting every day in a month ends up being really chunky.  I had to use 3 inch binder rings, which I found out, can be tricky to find!  I have another set of 3 that I'll list in my shop later today, in case you're looking for some.

Do you do December Daily?  Leave me a link to it in the comments.  

Tuesday, October 11, 2011

Mini Album Wallet (gift idea)

This mini makes a great gift for a grandparent.


This idea came from Paper Vine.  She's a wiz with paper crafts!


To make a mini album wallet like this you only need a 12x12 paper, your pictures, and whatever embellishments you choose to use.  


Each section, aside from the top flap, measure about 3.5 x 4 inches.  


To hold it closed I used a brad and baker's twine.  


Linking to THESE parties


Tuesday, August 2, 2011

Paint Chip Mini Album Wallet!

Don't you just love finding fun stuff to make with paint chips?  I sure do!

I took a 10 x 3 inch paint chip strip and made this little mini album wallet. 
This is so easy and does not have to take much time to make.


To hold it closed I used some adhesive Velcro.  


I used a paper creaser to divide the sections.


This yellow paint chip strip was perfect for this project.  The paint colors are "Taste of summer", "Sunkissed", and "Loves light".   Works well for summer beach photos!


To embellish this little album, I used paper and stickers from this summer pad I had already.


Gotta love paint chips!  
Do you have paint chip ideas?
 Linking up at my favorite link parties HERE

Wednesday, June 29, 2011

Mini Book Gift

We just celebrated a 60th birthday in our family. 
The four of us all contributed to this mini book gift.  

This idea was totally inspired by the 52 Reasons book.  
It's "60 Things That Make You Pretty Great."


I used my Cinch binding machine to put this book together.  


I used mostly THIS awesome set of 7 gypsies stamps to number each page. 


We all contributed to filling out the book.  The hubs did great filling in a lot of the pages.  
The ladybug and little guy drew pictures. 

I added in some pictures throughout the book.


I really liked how it turned out.  I especially love that we ALL had a part in making it.  
We may be whipping up some of these for Christmas gifts!
{Insert panicking husband here}
;-)


Linking up HERE so check these parties out!
Tickled Pink at 504 Main

Wednesday, June 22, 2011

Wedding Shower Card

If you're an Etsy lover like I am, I'm sure you've seen prints like these in the shops.  

I LOVE them. 

I wanted to make one as a card for an upcoming wedding shower.  The groom's hometown is in Nebraska and the bride is from here in Illinois.  


This card is made from layers of card stock. 


I did a google search for each state image, printed and cut them out (with fine tip scissors).


I traced the states on white cardstock and cut them out.  I used my cricut to cut little red hearts, but you could use stickers.  I placed the little hearts over their hometowns and added a little plus sign between them.


I plan to do another project something like this, so hopefully I'll have that ready to post soon!

Linking up at THESE parties

Friday, December 10, 2010

Paper Snowflake Art

Remember THIS paper patch?  
Well I wanted to make another one that would last through the winter, not just Christmas. 
Here's what I came up with...


I used some music sheets for a few of the snowflakes.  
For the rest I used different shades of blue papers.


Tuesday, November 30, 2010

Mini Album made from blank cards and envelops

The ladybug loves to help bake.  Especially if it involves a lot of taste testing.  She hears the clanging of the mixing bowls and runs to get a kitchen chair and pushes it over to the kitchen counter asking,
"can I help?"  

I wanted to preserve those moments with her in a mini album.


No need to go buy an album.  Gather up cards & envelops left over from other crafting projects and make one! (what better way to use all those extra blank cards and envelops!)


Let me try to explain how I did this.  Unfortunately I didn't take any pictures during the process.  

In this picture you can see the cards and envelops used to make the album
To make the album itself I only used cards, envelops and glue dots.  I put the blank cards back to back using glue dots to attach them.  This made the pages for inside the album.  For the covers I used the envelops, and again, glue dots to attach them.


I added a journal spot on the first page, one picture per page through the rest of the album, and a few simple scrapbook embellishments throughout.


A mini album filled with pictures baking with my little ladybug.  
I love those little moments in life.  
I've learned they really are the big ones.


Linking up with
Paper Issues Holiday Hook-Up
Blue Cricket Design
Somewhat Simple
HoH
Paisley Passions Thrilling Thursday

Friday, November 19, 2010

Last Name Art

I'm sure you've all seen the name art that's been floating around in the blog world.
If you haven't, these are some links to ones that inspired me...
I was just itchin' to make my own after checking out that eye candy! 


I used chipboard and metal letters from my scrap stash, and for the background I used pattern paper.  I had a little photo shoot and cropped the pictures.  Like I've said before I lack the fancy photo editing software, and I'm not familiar with any free and easy to use sites.  So...I copied my pictures into Word and resized them onto one page before printing in black and white.  I did it in color first, but I'm loving the black and white look so much more.

Linking to:
Tatertots and Jello
CRAFT
Craft-O-Maniac
Keeping it Simple

Thursday, November 18, 2010

Our Own Family Tree

I can't post the two family trees I'm working on as Christmas gifts, just in case they come and check out my blog.  One of them will have 31 people on it.  It's a bit of a challenge!  

But I figured it was about time I did one for our little family of four.  


Many, many years from now our tree will branch out, but for now it's small and perfect.


{Thanks to all who have linked up to the catwalk so far this week!  I will be featuring some of that awesomeness tomorrow!}

LinkWithin

Related Posts with Thumbnails